


Today’s article is regarding how to fix Zoom ‘Internet Connection Unstable’ error. A zoom is a tool that connects people and is one of the most widely used remote work and education tools in the world. However, zoom may display various error codes on the screen from time to time, indicating that your connection is not stable. Additionally, suppose your Zoom connection is unstable. In that case, you may encounter issues with video or audio buffering, as well as frequent disconnects.
Fix Zoom Internet Connection Unstable Error
This error typically occurs during a video conference. Obviously, you don’t have much time to fiddle with your settings or search for the source of the problem. As a temporary workaround, turn off your camera if you are currently using it.
This way, you can free up valuable bandwidth while maintaining the audio and screen sharing quality, allowing you to participate actively in the meeting.
1. Check Your Network Connection
To make a stable Internet connection, restart or unplug your modem and router. If any router firmware updates are available, install them on your device.
To ensure that Zoom has full access to your network bandwidth, check for and disable any other devices connected to your network. Additionally, you can accelerate your connection by using an Ethernet cable, which is more stable and faster than a wireless connection.
If a cable connection is not possible, make that you are not too far from the WiFi router. Ideally, the computer used for Zoom video conferences should be located within a few feet of the router.
Alternatively, you can change your WiFi channel and observe any differences.
After implementing all of these suggestions, check your connection and make that you have enough bandwidth (ideally, at least 2 Mbps up/down).
Note: Temporary infrastructure issues on the part of your Internet service provider may also have an adverse effect on your Internet connection. Contact your ISP and check about any known infrastructure or server issues.
2. Disable Bandwidth-Hogging Programs
We recommend disabling any other programs that are running in the background, especially bandwidth-intensive software such as cloud sync programs, streaming tools, and video-sharing programs.
If you’re using a VPN, disable it and see if network stability improves. According to some estimates, using a VPN can slow your connection by up to 30% or even 50% if the VPN server is not located in your region.
3. Disable SIP ALG And QOS
The SIP ALG, or Application Layer Gateway, is a tool that many routers include. Its primary function is to guard against router firewall issues. However, SIP ALG can occasionally cause more problems than it solves, and disabling it is a prudent decision.
To disable SIP ALG, perform the following steps:
1- Navigate to the Advanced Tab or Advances settings on your router’s admin page.
2- Next, select Setup and WAN setup.
3- Locate NAT filtering and check the option to disable SIP ALG.
4- Restart your router and check if Zoom continues to detect an unstable connection.
These instructions may vary according to the model of your router. SIP ALG is a feature found in the firewall settings of some routers. For detailed instructions, visit the support page for your router manufacturer.
Other users suggested that turning off QoS (Quality of Service) could also be beneficial. To refresh your memory, QoS is a widely used router tool that prioritizes traffic.
4. Renew Your IP Address
Refreshing your IP address is another possibility for resolving this Zoom unstable connection problem.
1- Open a command prompt with administrative privileges.
2- Enter the following commands one after the other, pressing Enter after each one:
- netsh winsock reset
- netsh int ip reset
- ipconfig /release
- ipconfig /renew
- ipconfig /flushdns
3- Restart your computer and start Zoom.
5. Change DNS Settings
1- Navigate to Settings > Network & Internet.
2- Select your internet connection from the drop-down menu.
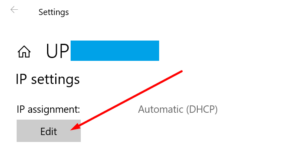
3- In the IP settings section, scroll down and click the IP assignment button.

4- Select Manual and configure your network and hardware to use IPv4 or IPv6.
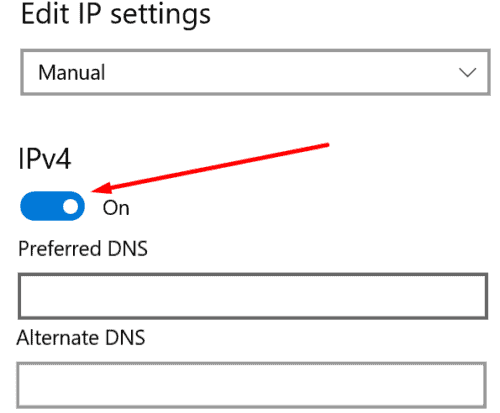

5- Input the primary and secondary DNS servers that you wish to use:
- Google Public DNS: 8.8.8.8 and 8.8.4.4
- OpenDNS: 208.67.222.222 and 208.67.220.220
- Cloudflare DNS: 1.1.1.1 and 1.0.0.1
6- Restart your computer after making the changes and check that the error has been resolved.
Kindly inform us of the solution that worked for you.