


This article is regarding how to fix Zoom camera not working. The Zoom is one of the most widely used video conferencing services on the planet. This tool is used by millions of users to host and participate in video meetings with family, friends, colleagues, and work collaborators. However, Zoom may occasionally fail to detect your Camera, which can be extremely inconvenient. So, naturally, you can continue to participate in meetings using only your microphone. However, if you wish to persuade others to accept your ideas or business strategy, you must address the camera issue immediately. You’ll be more persuasive if people can see you.
Solution: How To Fix Zoom Camera Not Working
If You’re Using An External Webcam
Ascertain that your Camera is properly connected. Gently press the Camera’s edges. Unplug the webcam cable and inspect the computer port for dust specks. Before reconnecting the webcam, unplug all other peripherals. Perhaps a few of them are interfering with your Camera. Additionally, if your laptop includes a dedicated physical switch for enabling or disabling the Camera, repeatedly disable the switch off and on.
Update Everything
That includes the Zoom app, the Windows 10 operating system, and camera drivers.
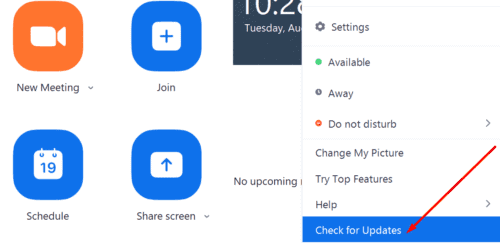
1- To update Zoom, right-click on your profile picture and choose Check for Updates.

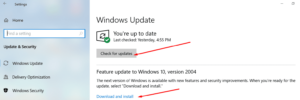
2- To install the most recent version of the Windows 10 operating system, navigate to Settings → Update & Security → Windows Update and click the Check for updates button.

3- Finally, but certainly not least, ensure that your camera drivers are current. Launch Device Manager and right-click on Camera. Select Update Driver from the context menu.
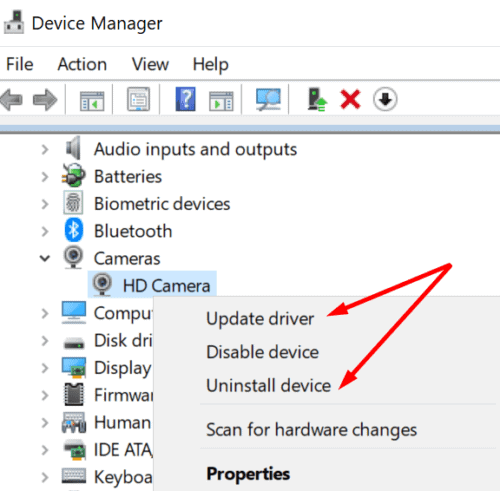

If the issue persists, repeat the select steps, but this time choose Uninstall device to completely remove your camera drivers. Restart your computer after that. Your computer will automatically install to the most recent driver version.
Manually Install Your Camera Driver
Alternatively, you can download and install your camera driver manually from the website of the camera manufacturer.
Check Your Privacy Settings
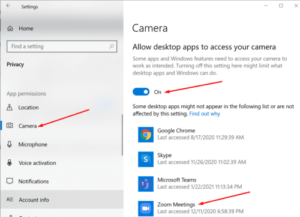
Windows 10 includes dedicated privacy settings that restrict software and hardware from accessing your Camera. Well, This may be one of the reasons why your Camera is not working on Zoom.
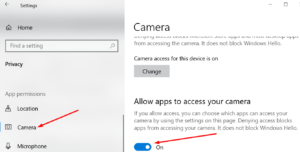
1- Open the Settings app and navigate to the Privacy section.
2- Next, click on Camera under App Permissions.
3- There is an option labeled Allow apps to access your Camera. Switch it on.

4- Click Allow desktop apps to access your Camera.
5- Then turn this option to grant Zoom access to and use of your Camera.

Register Your Camera Again
To accomplish this, we’ll use PowerShell.
1- Press the Windows + X keys to select the Windows PowerShell menu (Admin). This enables you to run PowerShell with administrative privileges and permissions.
2- To register your Camera app, type the following command:
Get-AppxPackage -allusers Microsoft.WindowsCamera | Foreach {Add-AppxPackage -DisableDevelopmentMode -Register “$($_.InstallLocation)\AppXManifest.xml”} re-register camera app powershell
3- After that, exit Windows PowerShell and restart Zoom. Verify that the camera issue has been resolved.
Close Other Apps That Could Access Your Camera
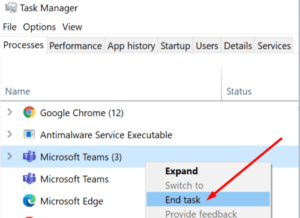
Well, Close any other apps or programs that may be utilizing your Camera. They could be accessing with Zoom’s ability to detect and access your Camera. Even if these programs are hidden from view, they may be running in the background.
For instance, if you previously used Microsoft Teams but did not close all associated processes, the app may still be active.
1- Open Task Manager and navigate to the Processes tab.
2- After that, locate any apps that may be utilizing your Camera.
3- Right-click each app and select Terminate Task.

Zoom Camera Not Working In Browser
If Zoom’s web version does not recognize the Camera on your laptop, the issue is most likely related to your current browser settings.
The following instructions apply to Google Chrome.
Nevertheless, they can easily be adapted to work with any Chromium-based browser.
1- Navigate to Settings > Privacy and Security > Site Settings.
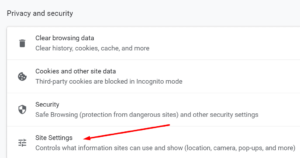

2- After that, select View permissions and data stored across multiple sites.
3- Enter zoom.us in the search bar and hit Enter.
4- To access the permission settings for zoom.us, select the domain and click on the small arrow icon.


5- Permit Zoom access to your Camera.
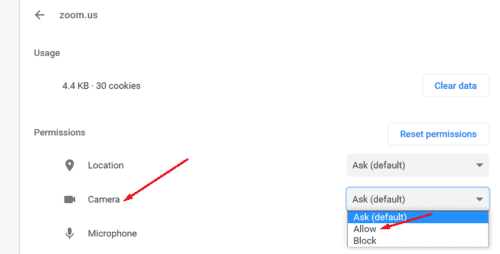

6- Click your browser’s refresh button. Analyze the results.
Additionally, you may want to clear the cache and disable any extensions that are installed.
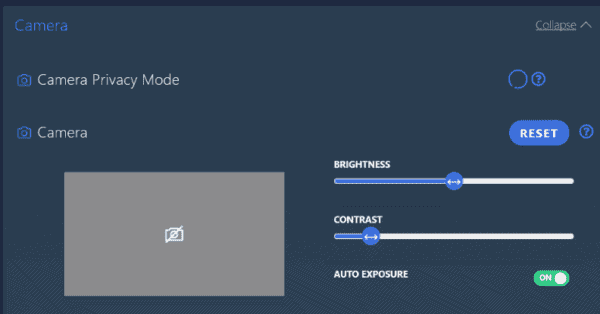
Zoom Camera Not Working With Lenovo Devices
If you’re having issues with the Zoom camera on a Lenovo device, disable the camera privacy setting in Lenovo Vantage.
1- Type ‘Lenovo’ in the Windows Search bar.
2- Make a selection from the Lenovo Vantage. If Lenovo Vantage is not already installed on your device, download it from the Microsoft Store.
3- Then, select Audio/Visual from the Hardware Settings menu.
4- Select Camera Privacy Mode from the drop-down menu. This option should be disabled.

The Bottom Line:
To summarise, if Zoom is unable to access your laptop camera, it is possible that your privacy settings are preventing the app from accessing your Camera. Restart your laptop and check your settings, then update Zoom and your camera driver. Finally, kindly inform us how your troubleshooting process went. Leave a comment below with your thoughts.