


Well, In Today’s article, we’ll show you how to make one page in your Microsoft Word 2021 or 2019 document display in landscape mode. Simply follow the steps below.
1- Begin by placing your cursor at the very beginning of the page you wish to convert to the landscape. (In our example, we’ll use page 2).
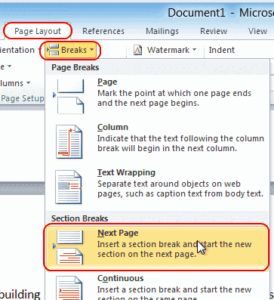
2- To create a new section, select “Layout” or “Page Layout” > “Breaks” > “Next Page.”

3- On the “Page Layout” tab, click “Orientation” > “Landscape.”
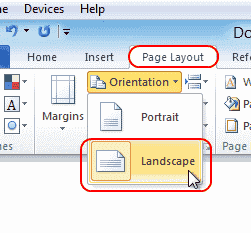

This effectively marks all pages following the break made in step 2 as landscape. Pages 2, 3, 4, and forward are in landscape mode in our example. Due to the fact that we only want page 2 to display in landscape mode, we will need to revert any forward pages to portrait mode.
4- Beginning your cursor at the top of the next page (in our example, page 3) or on the next page, you wish to remain in portrait mode.
5- Similar to step 2, select “Page Layout” > “Breaks” > “Next Page” to create another section.
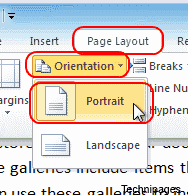
6- Under the “Page Layout” tab, click “Orientation” > “Portrait.” This will display the remainder of the document in portrait mode.

That is all! You have created a successful one-page landscape in Microsoft Word.
Extra Tip: If you have a header on your first page and do not want it to appear on the landscape page, you can do the following (after changing the page’s orientation to landscape):
1- On the landscape page, right-click on the header and select “Edit Header.”
2- Un-highlight the “Link to Previous” button.
3- Delete the page’s heading. It should remain on the first page.