


It’s time for macOS Monterey. But not everyone could upgrade to it because their systems and other things didn’t work well together. So, the only option left was to stick with macOS Big Sur. Unfortunately, even though macOS Big Sur is a stable operating system, users may run into unexpected problems, find that it won’t run old software or hardware, or needs to be faster for their needs. This causes many users to downgrade from macOS Big Sur to Catalina.
You might be one of the users who want to downgrade macOS but needs to know how. If so, this article is the only thing you need to know. This typed note shows you how to downgrade Big Sur quickly and easily without losing data. So let’s start with them immediately and not waste any more time.
How To Easily Downgrade From macOS Big Sur To Catalina?
Follow the steps below to downgrade macOS from Big Sur to Catalina.
Note: Before you try any of the methods below, you should back up your data to be safe and reduce the chance of losing important files. You can use Time Machine to back up your data, copy files to another location (like a USB drive), clone your Mac’s hard drive, or use iCloud to store important files.
Use Time Machine To Downgrade From macOS Big Sur To Catalina
If you used Time Machine to make a backup of your data, it is an easy process to downgrade macOS to Catalina. This task can be done in two easy steps, shown below.
Erase All Data Stored On The Device’s System Disk
The first step to downgrade from macOS Big Sur to Catalina using Time Machine is to delete all of the data on your Mac’s hard drive. Here are some ways to do it.
1 – Turn off your Mac, erase it, and set it up as new.
2 – Turn on the device while holding down the Command and R keys while it starts up.
3 – Choose Disk Utility from the Mac Utilities window.
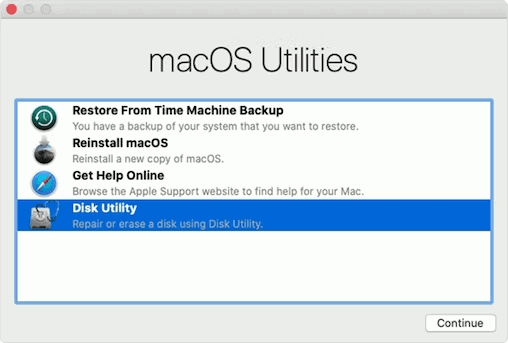

4 – select going, then choose Startup Disk.
5 – Choose “Erase” and then “APS Format.”
6 – Choose GUID Partition Map.
7 – Confirm the actions from above.
Restore Mac With Time Machine
Lastly, you can downgrade macOS Big Sur without losing any data by restoring your data from a Time Machine backup. The steps below will show you how to do it.
1 – Restart the Mac.
2 – To get to Recovery, press Command+R while the Mac is restarting.
3 – Select the Time Machine backup disc from the next window that appears on the screen.
4 – Choose the most recent backup you made.
5 – Select where you want to store the backup’s contents.
6 – Choose “Restore” and then “Continue.”
7 – Wait until OS Catalina loads on your Mac.
Use A Bootable USB Drive To Downgrade macOS Without Losing Data
Even though using a bootable USB drive to downgrade macOS is more complicated than using Time Machine, you can try it by following these steps.
Make A Bootable USB Drive For Catalina
Before you downgrade from macOS Big Sur to Catalina, you must make a drive that can boot. Here are the exact steps you need to take.
1 – Plug an external drive with more than 12 GB of storage into your Mac.
2 – Go to the App Store and get a copy of Catalina for macOS.
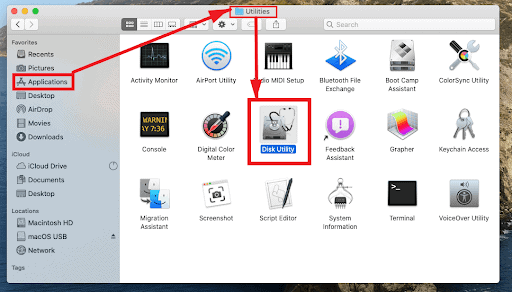
3 – Next, on your Mac, navigate to Applications and choose Utilities.
4 – Choose Disk Utility.

5 – Choose your external drive in the list on the screen, click “Erase,” and then choose “Mac OS Extended format.”
6 – After you’ve done the steps above, use the Utility folder to open the Terminal.
7 – Type or copy the sudo /Applications/Install\ macOS\ Catalina.app/Contents/Resources/createinstallmedia –volume /Volumes/MyVolume command and press Enter.
8 – Type in the password for your Mac’s admin account.
9 – Follow the instructions in the Terminal to close it.
10 – Remove the USB drive from your Mac.
Prepare Mac To Boot From USB
Well, if your Mac has a T2 chip, you need to make it up to boot through USB. Here is how to do it step by process.
1 – Restart the Mac while restarting down the Command and R keys.
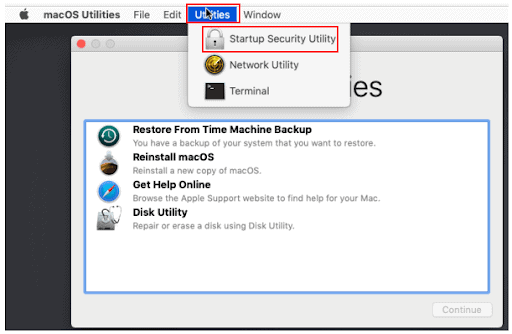
2 – Go to Utilities and choose the Startup Security Utility option.

3 – Type in the firmware’s password.
4 – Click Next to let your Mac boot from an external drive.
5 – Let the process come to an end.
Install Catalina Through USB
In the step above, we made a bootable drive to downgrade from macOS Big Sur to Catalina. In this step, we’ll follow the directions below to install Catalina using this bootable drive.
1 – Connect your device to the external drive.
2 – Go to System Preferences on your Mac and click on the Startup Disk tab.
3 – Make the external drive your boot disc.
4 – Choose Restart and wait for your device to start up in recovery mode.
5 – Select the “Install macOS” option and select “Continue.”
6 – To finish the installation, do what the directions say.
7 – Wait until macOS Catalina restarts your Mac.
Conclusion:
This article answered one of the most important questions: how to downgrade from macOS Big Sur to Catalina without a USB and with a USB. You can use any of the above methods to follow an older OS on your Mac.
But if you downgrade to an older version of macOS, keep in mind that Apple might not release security updates for old versions of macOS in the future. So, it would be best if you didn’t move back to Catalina from Big Sur unless you have to. You can share any other questions, concerns, or ideas about this article in the comments section.