


This article is regarding how to allocate more RAM to Minecraft. Despite its simplistic graphics and gameplay, Minecraft can be a resource-intensive application. Well, There’s a lot going on in the background, particularly once you begin experimenting with Redstone-heavy builds.
When mods are added, the standard amount of RAM required for Minecraft to run becomes insufficient. Without sufficient RAM, you will experience stuttering, crashes, and other issues that will render the game unplayable.
Well, The good news is that it’s relatively simple to allocate more RAM to Minecraft. The other good news is that there are multiple ways to accomplish this.
Make Sure You Have RAM To Spare
The first step is to determine the exact amount of RAM installed on your computer. This is easy.
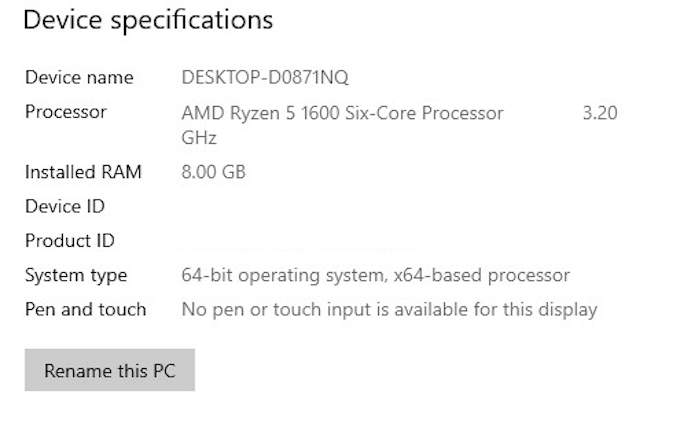
1-Select the Settings icon from the Start menu (it looks like a gear).
2- Click the About option.
3- Locate Installed RAM under Device Specifications. The number next to that indicates how much RAM you have available.
Minecraft requires a minimum of 2 GB of RAM, with 4 GB being recommended. If you possess more than that, you are in the clear. You can now allocate all the RAM required by Minecraft to quench its thirst.
Method #1: Allocate RAM From The Default Launcher
Although the original default Minecraft launcher has changed over the years, you can still increase the amount of RAM allocated to Minecraft.
1- Select the Minecraft Launcher and choose the version of Minecraft you wish to play (either Bedrock or Java)
2- From the tabs at the top, select Installations. Although you will see a list of releases below, if you have not specified which versions to play, you may only see the most recent version.
3- Hover your cursor over it, then click the three white dots on the right, followed by Edit.
4- A screen will appear with the installation’s name, version, and a few other settings. Scroll down until you see JVM Arguments under More Options. This box will contain a large lot of code, but all that matters is the first snippet, which looks like this:

-Xmx2G
5- The final number indicates the amount of RAM that Minecraft consumes. Change “2” with the amount of RAM you want Minecraft to use.
Allowing it to use all available RAM is possible, but whether it actually does so depends on whether you have anything else running and open in the background.
6- After making the necessary changes, click Save and restart the game. You should immediately notice an improvement in performance.
Method #2: Allocate RAM From The ATLauncher
If you’ve downloaded mods or spent many lots playing Sky Factory, you’re probably already familiar with the ATLauncher for Minecraft. Setting aside additional RAM is even easier with the ATLauncher than it is with the default launcher, especially because you are not required to work with any code.
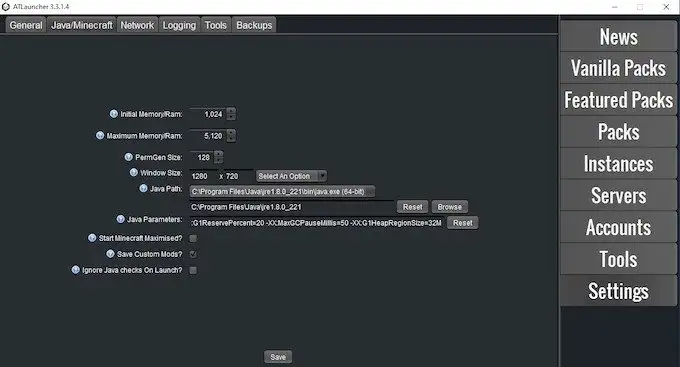
1- Launch the ATLauncher.
2- The launcher’s right side contains a list of options. At the top of the screen, click Settings and then the Java/Minecraft tab.
3- There are several options available, but the one you’re looking for is the second one – Maximum Memory/RAM. You can type the amount you want to allocate manually or use the up and down arrows. This moves the amount of allocated RAM up or down in 0.5 GB increments.
4- After selecting the amount of RAM to use, click Save. If you’re using a mod-heavy pack such as SkyFactory, you’ll need to allocate more RAM to the game, or it will fail to launch. Sky Factory 4 required a minimum of 4 GB of RAM during testing, or it encountered startup errors.
Method #3: Allocate RAM Using The Twitch/Curse Launcher
Additionally, you can use the Twitch launcher to play a variety of Minecraft mods (or vanilla Minecraft). Changing the launcher’s settings is just as easy as it is in the ATLauncher above, but the initial method to those settings is slightly different.

1- Click the three lines in the top-right corner, navigate to Files, and then click Settings. Additionally, you can open the Settings menu by pressing CTRL + Comma from within the launcher.
2- From there, navigate to Minecraft and scroll all the screen down to the bottom. A section titled Java Settings will appear. Next, locate and click the slider for Allocated Memory.
3- By default, it provides Sky Factory 4 with 3,228 MB of RAM. You can also drag the slider to the left or right to allocate or decrease the amount of RAM allocated to the game. The slider increases or decreases RAM in increments of 0.25 GB.
4- Once the slider has been moved, you are finished. Return to Mods, select Minecraft, and launch your improved title. Simply put, it’s that easy.
While allocating more RAM to Minecraft can (and frequently does) make performance, there are instances where allocating too much RAM degrades overall system performance.
Other components of your computer also require RAM. While these will have little effect if they are not running concurrently with a game, it is frequently a good idea to make at least 1 GB of RAM to non-gaming processes.
If you change your RAM settings and still do not receive the performance you expect—or if your PC reports an incorrect amount of RAM—this may indicate that there are other memory-related issues. Therefore, it’s a great idea to check for poor memory on a regular basis.
The good news is that even if you do have a RAM issue, swapping it out is straightforward. Indeed, if you want to boost performance even further, it’s worth considering upgrading your system’s RAM, especially as memory prices continue to fall.
Also, Check :