


You may already be familiar with AirDrop and its capabilities. However, occasionally, while transferring data, photos, or movies from your iPhone to another device, you may encounter the ‘AirDrop Not Working’ problem. A network issue, a software error, or system incompatibility might all be the cause of such an issue. Fortunately, we’ve compiled a list of useful solutions based on user input and testing. Without further ado, how about we discover how to fix AirDrop not working on an iPhone/iPad?
Solution: How To Fix AirDrop Not Working On iPad And iPhone
All of the patches listed below are compatible with iPhones dating all the way back to the original iPhone 4S. Kindly inform us of the workaround you used to fix the AirDrop not responding issue.
1. Force Restart The Device
One of the most efficient methods for resolving the ‘AirDrop Not Working’ issue is to force fix the iOS device by simultaneously pushing the Home and Power buttons until the Apple logo displays on the screen. Users of older iPhone versions may need to simultaneously press the Home and Volume buttons to Force Restart the device. As soon as the device resumes, try to send files over AirDrop; the connection should establish properly and operate properly.
2. Reset Network Settings
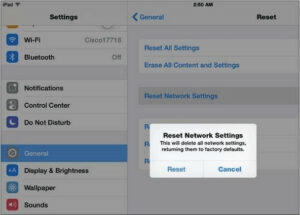
If there is a problem with the network connection, you may try to fix the AirDrop not working problem by resetting the Network Settings on your iPhone or iPad. To reset the settings, follow the process outlined below:
1- Navigate to the General tab in your iPhone’s settings.
2- Navigate to the Reset menu and select the Reset Network Settings option.

Once the settings have been reset, you should be able to simply fix AirDrop not working on the iPhone. Otherwise, you may move on to the next workaround!
3. Update iOS
AirDrop not working on iPhone/iPad might be the result of an out-of-date or damaged operating system. Therefore, try your iOS to the current version, which is bug-free and has new features. To update your iPhone or iPad device using iTunes, simply follow these steps:
1- Before you begin, make certain your Mac is running the most recent version of iTunes.
2- Open iTunes and connect your iPhone/iPad to your Mac using the USB cable.
3- Navigate to the Device tab and click the Summary section.
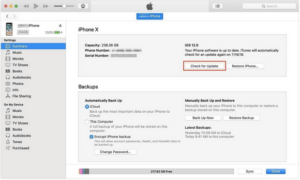

4- At this point, you must click the Check for Update button.
5- Click the Download and Update button, followed by a Confirmation that you agree to the new version’s installation.
6- You may be prompted to input your iPhone or iPad’s Passcode to continue the process.
After updating your iOS device to the current version, try utilizing AirDrop; it should now operate flawlessly. If not, do not despair; simply try on to the next workaround.
4. Toggle On Bluetooth & Wi-Fi
Both Bluetooth and Wi-Fi are critical to the working of AirDrop. If these options are accidentally deactivated or interfere with their normal operation, this might result in ‘AirDrop Not Working On iPhone/iPad.’ To restart these settings, follow the instructions below:
1- From your iOS device’s Home Screen, navigate to Settings.
2- Navigate to the Wi-Fi settings and toggle it off, and then back on.
3- Repeat the procedure using Bluetooth. Toggle the settings off and then back on.


The process will simply terminate the current connection and allow you to establish a new one using AirDrop as you transfer files.
5. Use iOS Data Transfer Tool
If none of the techniques above resolved your AirDrop not working issue. You might also try a third-party iOS data transfer software such as EaseUS MobiMover, which enables you to simply exchange your photos between iOS devices. To utilize the program, simply follow these steps:
1- Download and install EaseUS MobiMover for Windows or Mac on your computer.
2- Connect your iPhone or iPad to your computer via a USB cable.
3- Open EaseUS MobiMover and navigate to Photos > Pictures.
4- Simply select the photos or albums you desire to transfer from one iOS device to another.
5- Select the ‘To another Phone’ option to begin the transfer process.
6- Once the process is complete, check the target device and open the Photos app to view all your data.


Hopefully, employing a third-party tool such as EaseUS MobiMover would fix you in resolving the AirDrop not working on iPad or iPhone issue.
6. Adjust AirDrop Settings
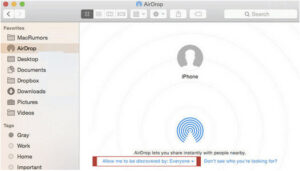
If you’re having issues with AirDrop, you’ll need to make the AirDrop settings and make the device visible to Everyone. For example, if you’ve chosen the Contacts Only option, you may be unable to connect to a specific device to share your files over AirDrop. To effect the necessary changes, simply make these steps:
1- On an iPhone or an iPad: Navigate to Settings > Navigate to the General menu > AirDrop > and select the Everyone option.
2- On a Mac: Launch Finder > Navigate to and pick AirDrop > Select Everyone from the settings – Allows me to be discovered by.

Now that the visibility status has been changed to open for Everyone, your ‘AirDrop not working on iPhone/iPad’ problem should be rectified!